


Mad Scientist Laboratory Ideas for a Haunted House
The most useful starting point for a mad scientist laboratory is one question: what went wrong here? Perhaps the scientist restored a body that should have stayed still. Perhaps the experiment has learned to recognize visitors. Choose one answer and let the room reveal it.
You do not need a wall of equipment to communicate that story. A workbench, a readable experiment label, and one convincing creature can give an October haunt a clear beginning, middle, and scare. Build the laboratory around what guests can see from their route, then add details that reward a closer look.
Write the laboratory's story in one sentence
Try this premise: “The latest subject is awake, and the scientist is pretending the procedure worked.” It suggests a workbench full of notes, an anxious performer, and a creature that moves at the wrong moment. Another option is an abandoned laboratory where the visitor discovers the experiment without a scientist present.
Choose the version your team can perform consistently. A two-actor exchange needs coordination. A single creature reveal needs a strong visual setup that explains why the figure is there. Avoid filling the room with unrelated aliens, clowns, and cemetery props unless the story connects them.
Make The Monster the unfinished experiment
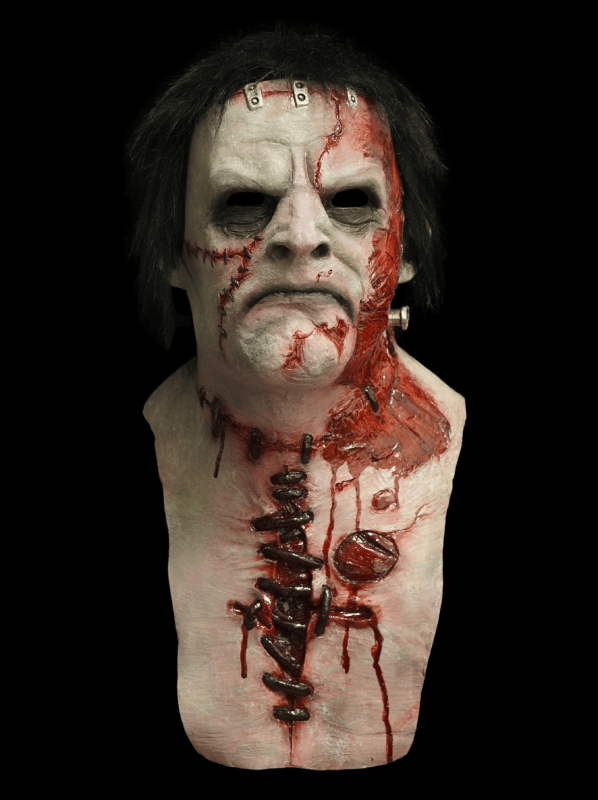
The Monster HD Studios Pro Halloween Mask has an overhead design, hand-laid hair, painted gore details, and a chest cover plate that can sit under a jacket. Those features suit a reanimated-creature scene where guests see the face, hair, and upper body before they see the full costume.
Build a separate costume around the mask with clothing chosen for your performer and set. A worn-looking jacket over plain layers can suggest an unfinished subject. The clothing, scenic equipment, and other accessories in this scene concept are separate from the mask.
For the reveal, start with the creature standing in a clearly defined performance space beside the workbench. The scientist points toward an experiment log, and the creature slowly turns its head toward the visitors. Test that small action before adding a larger movement. Guests need to recognize a face before its movement carries meaning.
Divide the room into three visible zones
The first zone is the explanation: a sign, chart, or notebook that establishes the failed experiment. The second is the creature's location. The third is the clear route onward. A guest should understand all three without needing a tour of every object in the room.
- Explanation: one readable heading such as “Subject 13: observation in progress.”
- Experiment: the actor, one supporting scenic structure, and light that reveals the mask.
- Way out: a visible route that stays separate from the actor's working area.
Try this layout in a small room: put the notebook on a narrow bench to one side, with the creature just beyond it. Guests look toward the notes, then discover the figure in the same general sightline. Keep the opposite side available for passage instead of forcing visitors between the actor and the bench.
Suggest equipment without building a working laboratory
Lightweight empty containers, printed diagrams, oversized switches used as scenery, and clearly fictional specimen labels can imply research. Choose a few objects large enough to read at walking speed. Tiny handwriting and dozens of identical bottles often disappear once the room is dim.
Use scenic materials for their intended purpose and keep fragile objects away from visitors. Decorative tubes and cables should not cross the guest path or attach the performer to furniture. Avoid an actor setup that depends on restraints, a locked enclosure, or climbing onto a makeshift table.
Give the bench a visual hierarchy. One experiment log can be the main clue; the other objects support it. Repeating the same subject number on a chart and a label helps connect the details without requiring guests to stop and read a paragraph.
Light the face before adding dramatic color
Start with enough light to distinguish the creature's face from the background. Look at the mask from the height and angle of an approaching guest. If the brow, cheeks, and mouth disappear, adjust the light before layering in a colored background.
A cool laboratory wash and a separate accent on the workbench can establish different areas. Constant lighting is enough for this concept; the scene does not depend on flashing lights. Test any effects with the complete costume, scenic materials, and equipment in their final positions.
Keep the exit route readable throughout the performance. The dramatic moment should come from the experiment moving, not from making the floor or doorway difficult to see.
Give the scientist one line and one cue
A short line is easier to repeat during a busy October evening. “The subject only reacts to movement” gives the creature a reason to turn its head as the group approaches. The scientist can then step aside and allow the guests to continue.
If you use audio, assign a single cue to the reveal rather than playing constant alarms. Our three-cue sound plan explains how atmosphere, warning, and reveal can work together. Rehearse a version that still makes sense if a cue is missed.
Finish with a repeatable reset
Between groups, the scientist returns to the notebook and the creature resumes its starting pose. Nothing should need rebuilding after every performance. Run the scene several times with volunteers, including one group that walks quickly and another that pauses.
For help finishing the performer, see how to build a full Halloween costume around a scary mask. Start with The Monster mask, build a readable costume around it, and let the first movement finish the story.


Leave a comment